
High School Student Blog: Project on Self Driving Cars
Self-Driving Cars Project Part 1
Welcome to the first of three posts about a Self-Driving Car Project I have had the pleasure to work on for the past few weeks.
We began by learning about the OpenAI Gym, an online environment that simulates a real car and environment through algorithms and programs we feed into the computer. More specifically, OpenAI is composed of states and observations (the actual environment of the simulation), actions (the actions the driver can take), and rewards (the results and effects of the actions).
Here’s what the OpenAI simulator looks like:

The objective of this project is to use machine learning and AI algorithms to determine and model a driver in the real world with a policy that uses reinforcement learning (RL). RL is a set of algorithms that learn from each other. It begins with an agent that uses a certain data set, creates an action, and learns from the reward to improve the model. In further detail, the basis of RL is made up of 3 steps: 1) an action that is made by the agent which changes the environment, 2) the change in the environment which affects the reward (impact) and state (situation), and 3) the reward and state which change the agent. The cycle is repeated several times. In professional and advanced RL cycles, these loops can be run continuously for millions of times!

Some examples of every-day programs that use RL include AI player-vs-computer games (the computer learns the strategies of the game), traffic light control (the machine learns common routes), online advertising (websites show ads that have interest to you), and AI assistance robots like Alexa (that learn from your common questions and conversations).
After learning about RL, we then translated the process to code. Our controller was created with the direction, gas, and break, respectively, for our parameters. For example, (-1, 1, 0) would tell the car to go backward at full speed. It should be noted that the gas and brake cannot both be 1 at the same given time.
The second part of our code required actions that we created to evaluate the state and reward. We did this by setting three more parameters: observation (what our AI driver can see), environment (the entire simulation), and time step (every timestep, our AI driver can choose a different action).
Lastly, with this, we were able to develop our RL model to identify color (brown = road; green = off-road), and acceleration (an increase in gas).

In summary, this first blog post discussed the use of reinforcement learning and coding for use with a self-driving car. In the second blog post, we will cover behavioral cloning — using neural networks for policies.
Self-Driving Cars Project Part 2
Welcome back to the second blog post in this three-part series. In this post, we will cover behavioral cloning and Q-learning.
Behavioral Cloning
To understand behavioral cloning, we must first define what neural networks are. Neural networks are a group of algorithms used to categorize and analyze certain data sets. They were built to “mimic” the human brain and are composed of multiple steps as defined and illustrated below:
Inputs: the several algorithms that make up these neural networks are fed data
Weights: weights are used to “prioritize” any inputs over others
Weighted sum: the sum of each of the new inputs
Bias: the bias serves to adjust the algorithm
Activation function: there are multiple types of activation functions (i.e. ReLU) that are used to moderate the output. These activation functions are nonlinear, meaning that they have a changing slope

Now that we have a good idea of what a neural network is, the definition of behavioral cloning is very simple. Behavioral cloning is the concept used by neural networks to learn from different situations.
In this situation, we use behavioral cloning by inputting ~ 4,000 different actions into a neural network. Accompanying each of these actions is a data set of what the environment looks like. Therefore, the neural network uses this to output an action that the network chooses. Our results looked like this:
While the car was on the road for most of the simulation, to maximize the safety and effectiveness of our neural networks, we created three different Q-learning policies which we will now explain.
Q-Learning Policies
Q-learning policies refer to functions that can be made to determine the quality of the best possible “reward” given a certain action and state. For this simulation, we made 3 distinct Q-leaning policies and tested them.
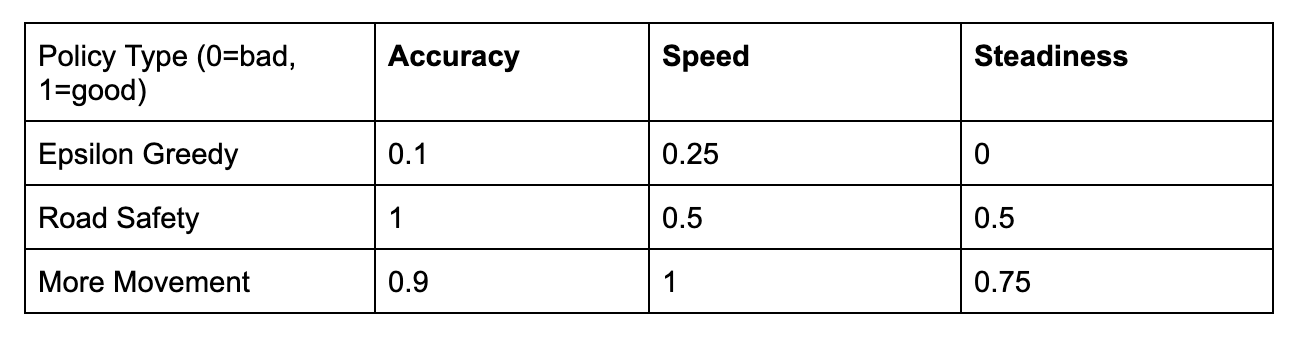
Epsilon-Greedy Policy — This first Q-learning policy chose a random action every ε (epsilon) intervals. Although this policy allows the simulation to explore more possible actions and rewards it also led the car to drive off the road at various times and was not steady. Here’s a video of what happened:
Road Safety Policy — The sole objective of this second Q-learning policy was to maximize the safety of the people in the simulated vehicle by severely penalizing the neural network’s actions whenever the car would drive off the road. With the implementation of this policy, although the car did not drive off the road, it was very slow:
More-Movement Policy — This third and final Q-learning policy allowed us to penalize the model when it did not accelerate. Therefore, with this policy in place, we were able to get the best results, with a faster, more realistic driving simulation. The vehicle stays on the road for all but one situation:
In conclusion, while each of these policies had their pros and cons, we determined that the More-Movement Policy had the most benefits overall. We created a chart to show this:
In the next, and last, post, we hope to go into further detail on the nitty-gritty aspects of a policy and what Q-learning is, as well as the real-world applications and next steps of this project.
Self-Driving Cars Project Part 3
Welcome back to the final post of this three-part Self-Driving Cars Project. We will discuss the code that goes into a simple policy and Q-learning, as well as the real-world applications.
First, we chose to create a simple policy so that the simulated self-driving car could make its own actions. To make this policy, we inputted the observation (obs), environment (env), and time stamp (ts). We then use an array made up of three possible factors that could contribute to a given action — direction, gas, and break. Using the three inputted actions, the simulated car is able to distinguish between road (gray) and not road (brown), determine if there is a vehicle in front of the car, and check to see where the road is.
We were prompted to create a policy that would alternate between going forward and turning left. Below, please view the code, the line-by-line explanations, and a video of what the simulation looked liked.

Line 1: The observation, environment, and timestamps are inputted.
Lines 3 and 4: If the timestamp is even, then the direction is at 0 (straight), the gas is 1 (on), and the break is 0 (off).
Lines 5 and 6: If the timestamp is odd, then the direction is at -1 (left), the gas is 0 (off), and the break is 0 (off).
Second, a Q-learning function is defined as a function that determines the quality for the best total reward after making a certain action in a specific state. The input of this function is Q(s,a), the quality of taking action a at state s.
In most cases, we want to choose the action a to which Q(s,a) has the highest score. However, the overarching purpose of this, regardless of the scenario, is that, at state s, we must choose the most optimal action a.
Throughout this project, we came across issues with Q-learning such as unique situations that have never been experienced by the car/simulation. Because of this, we used Deep-Q-learning. We made a “q-approximator,” (in this case a neural network) which attempted to predict the q-values for each action. We were able to execute this idea because, by generating data, the simulation trained itself. While this simulation began with random choices, as the timestamp increased, the accuracy of the decisions increased significantly. Check out Post #2 to find more details and the results of this!
Lastly, before ending any ML (machine learning) and AI (artificial intelligence) project, it is important to discuss real-life applications and next steps. While it may seem obvious, the real-life applications of this project are not just limited to self-driving cars. In fact, automated robots use very similar ML techniques such as the reinforcement learning loop to process unique situations. Some AI light control systems also use similar processes to formulate data on common car-driving paths and predict when to change light signals.
The next steps of this project include perfecting all three Deep-Q-learning policies and allowing these policies to adapt to unique vehicles, improve accuracy for unique situations, and make ethical and moral decisions in real-time.
Thanks for reading this three-part series where we discussed the reinforcement loop, the Open AI simulations, behavioral cloning, and different types of ML policies for this Self-Driving Cars Project!
Colin Chu is a Student Ambassador in the Inspirit AI Student Ambassadors Program. Inspirit AI is a pre-collegiate enrichment program that exposes students globally to AI through live online classes. Learn more at https://www.inspiritai.com/.